Contouring Round Face: Simple Steps For A Defined Look
Are you looking to bring out your best features and give your face a bit more shape? If you have a round face, you might feel like it lacks definition, but that is totally okay. Many people want to learn how to make their face appear more sculpted. The good news is, with just a few clever makeup tricks, you can create a wonderful illusion of structure and angles. This guide will show you how to do just that, so you can feel more confident about your look, you know?
Contouring, in a way, is a makeup technique that uses different shades to define, enhance, and sculpt the structure of your face. It's like painting with light and shadow, making some parts stand out and others recede. Professional makeup artists often use this method to really bring out cheekbones, define jawlines, and subtly shape the face, and that is very helpful.
This approach helps sculpt and add dimension to your face by using makeup that is slightly darker or lighter than your natural skin color. It can help change the shape of your appearance, creating an optical illusion, as celebrity makeup artist and Mary Kay ambassador Jaleesa Jaikaran puts it. So, you are about to learn how to transform your face shape using makeup to create shadows and highlights, which is pretty neat.
Table of Contents
- Understanding Your Round Face
- The Basics of Contouring for Round Faces
- Step-by-Step Contouring for a Round Face
- Highlighting Your Round Face
- Blending is Key
- Common Mistakes to Avoid
- Tips from the Pros
- Frequently Asked Questions About Contouring Round Faces
Understanding Your Round Face
A round face typically has similar width and length, with soft, curved lines and a less defined jawline. You might notice the widest part of your face is around your cheeks. The goal with contouring a round face is to add some angles and length, making it appear more oval-shaped, or just a little bit more structured, you know?
It is not about changing what you look like, but rather enhancing your natural beauty. This technique helps to sculpt and define the face, giving the appearance of higher cheekbones and a more chiseled jaw. So, it is about playing with light and shadow to create the look you want, which is pretty cool.
The Basics of Contouring for Round Faces
Contouring is a way to transform your face shape using makeup to create shadows and highlights. For round faces, the idea is to create shadows along the sides to narrow the appearance and add highlights to the center to bring out features. It is all about creating that optical illusion, really.
Choosing Your Products
When it comes to contouring, you have a few choices for products. You can use creams, powders, or even sticks. Cream contour products often give a softer, more natural look, blending into the skin beautifully. They are quite good for drier skin types, too.
Powder contours are often easier for beginners to work with, as they are simple to blend and build up gradually. They are good for oily skin, or for setting cream products. Sticks are very convenient for quick application, and they are easy to carry around, which is nice.
Finding the Right Shades
The key to good contouring is choosing the right shades. For your contour shade, pick one that is about two to three shades darker than your skin tone. It should have a cool, grayish undertone, as this mimics natural shadows. Avoid anything too warm or orange, as that looks more like bronzer, and that is not what we are going for here, obviously.
For your highlight shade, choose one that is two to three shades lighter than your skin tone. This can be a matte or a subtle shimmer. The highlight should bring areas forward, making them catch the light. So, it is about contrast, really, to make things stand out.
Tools You Will Need
Having the right tools makes a big difference. You will need a good brush for applying your contour product. For cream or stick contours, a dense, angled brush or a beauty sponge works well. For powder contours, a fluffy, angled brush or a smaller, tapered brush is often best.
You will also need a separate brush for your highlight, perhaps a smaller, softer one. And, of course, a blending brush is very important, maybe a fluffy one, to soften any harsh lines. Good blending is what makes contouring look natural, you know?
Step-by-Step Contouring for a Round Face
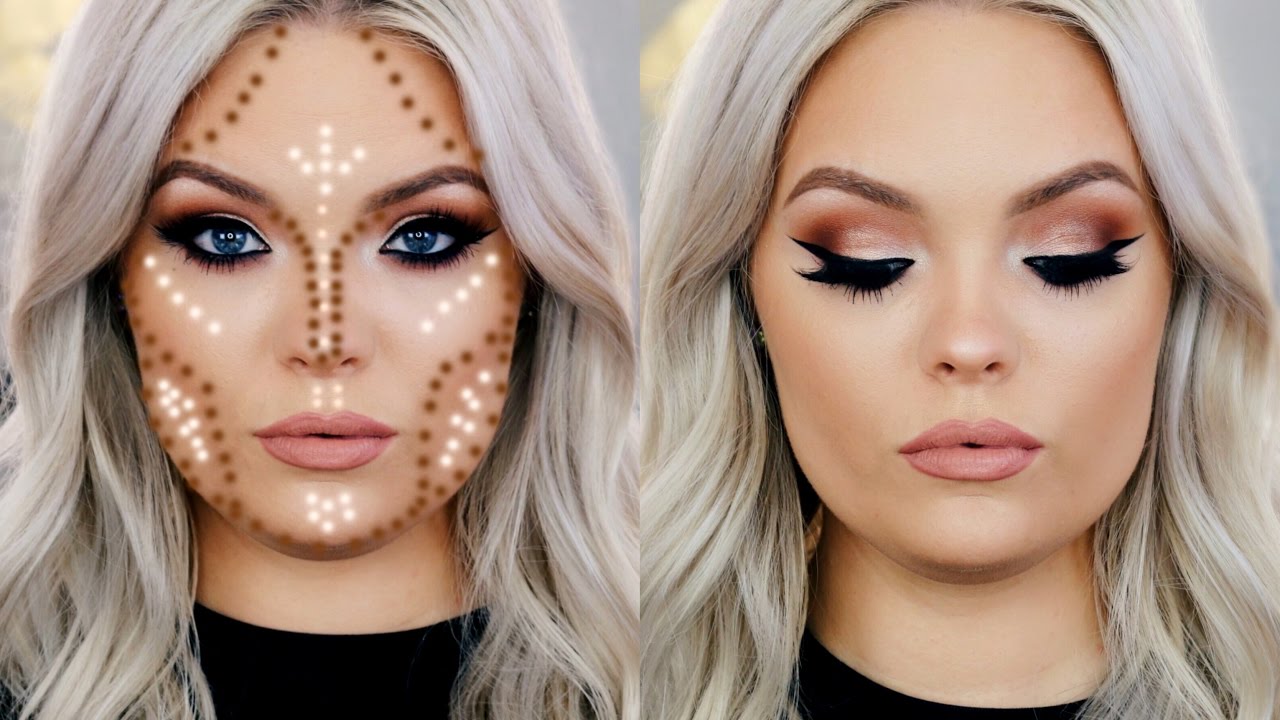
This contouring guide for beginners provides you with easy and fundamental steps to achieve stunning, sculpted features. Here is how professional makeup artists recommend bringing out your cheekbones, defining your jawline, and sculpting your face subtly with contouring and highlighting makeup. It is simpler than you might think, honestly.
Contouring the Cheeks
For a round face, you want to create the illusion of higher, more defined cheekbones. Locate the hollows of your cheeks. You can find these by sucking in your cheeks a little bit, or by feeling just below your cheekbone. This is where you will apply your contour, sort of.
Apply your contour product in a diagonal line, starting from the top of your ear and going towards the corner of your mouth, but stopping about two fingers' width from your mouth. Keep the line straight, not curved. This helps to lift and slim the face. Blend this line upwards and outwards, really, to soften it.
Defining the Jawline
A well-defined jawline can make a round face appear more angular. Apply your contour product along your jawbone, starting from just below your ear and going down towards your chin. Make sure to extend it slightly under the chin to minimize any softness there, you know?
Blend this line downwards and slightly onto your neck. This helps to create a shadow that makes your jawline look sharper and more distinct. It is about creating a clear line, but still making it look natural, which takes a little practice, sometimes.
Shaping the Forehead
If your forehead appears wide or prominent, you can use contour to make it look a bit narrower. Apply your contour product along your hairline, especially on the temples and along the sides of your forehead. This creates a shadow that makes the forehead appear smaller, or just a little less broad.
Blend this contour into your hairline and downwards towards your temples. The idea is to soften the edges of your face and create a more oval shape. It is a subtle change, but it can make a big difference in the overall balance of your face, you know?
Contouring the Nose
Contouring the nose can make it appear narrower or more refined, if you want. Apply two thin lines of contour product down the sides of your nose, starting from the inner corner of your eyebrows and going down to the tip. Keep these lines straight and close together, that is the trick.
Blend these lines outwards very gently. You can also add a tiny bit of contour to the very tip of your nose if you want to make it look shorter. This step is optional, but it can add a lot to the sculpted look, really.
Highlighting Your Round Face
Highlighting works hand-in-hand with contouring. While contour creates shadows, highlight brings light to certain areas, making them stand out. For a round face, you want to highlight the center of your face to draw attention inwards and create the illusion of length, obviously.
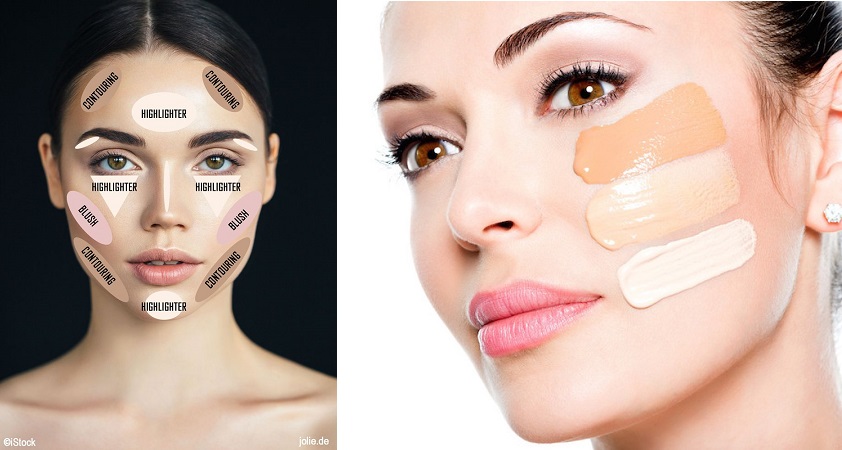
Apply your highlight product to the center of your forehead, down the bridge of your nose, on the tops of your cheekbones (just above your contour), on your cupid's bow (the dip above your upper lip), and on the center of your chin. These are the areas where light naturally hits, so it looks very natural, usually.
Blending your highlight is just as important as blending your contour. You want a soft, luminous glow, not harsh stripes. This step truly brightens your face and makes your sculpted features pop, which is pretty cool. It completes the look, in a way.
Blending is Key
Blending is arguably the most important step in contouring. Harsh lines will make your makeup look obvious and unnatural. Use a clean, fluffy brush or a damp beauty sponge to blend out all your contour and highlight lines. You want a seamless transition between shades, you know?
Blend in small, circular motions, or gentle tapping motions, until there are no visible lines. Take your time with this step. Good blending makes your contour look like natural shadows and light on your face, not like makeup. It is really what makes the whole thing work, honestly.
Common Mistakes to Avoid
When you are learning how to contour a round face, there are a few common errors to watch out for. First, using a contour shade that is too warm or orange. This looks more like bronzer and does not create a believable shadow. Always go for a cool, grayish tone, as a matter of fact.
Another mistake is applying too much product. Start with a little bit and build up gradually. It is much easier to add more than to take away. Also, not blending enough is a big one. Harsh lines are a dead giveaway that you are wearing contour, and you want it to look natural, right?
Placing contour in the wrong areas can also make your face look different than you intended. For a round face, remember to focus on the outer edges and below the cheekbones to add length and definition. Do not contour too close to the center of your face, for example, as that can make it look wider, which is not the goal.
Tips from the Pros
Here, three makeup artists break down everything you need to know about contouring. They suggest that practice makes perfect. Do not get discouraged if your first few attempts are not exactly what you hoped for. Keep trying, and you will get better with each go, you know?
According to these pros, natural light is your best friend when applying contour. Always check your makeup in natural light to make sure it looks seamless and well-blended. What looks good under artificial lights might look different outside, so, keep that in mind.
Also, remember that contouring does not have to be dramatic. Whether you want a subtle glow for daily wear or a dramatic look for a special occasion, you can adjust the intensity. You can learn everything you need to know about contouring and discover how to contour like a makeup artist with these easy sculpting tips and tricks. It is really about what feels good for you, in a way.
You can learn more about on our site for more beauty tips. Also, for product recommendations, link to this page .
Frequently Asked Questions About Contouring Round Faces
What is the best way to contour a round face for beginners?
For beginners with a round face, start with a cream or powder contour stick that is easy to apply and blend. Focus on the hollows of your cheeks, drawing a straight line from your ear towards your mouth, stopping before the corner. Also, apply a line along your jawline. Blend, blend, blend everything out thoroughly for a soft, natural finish. It is simpler than it sounds, honestly.
Where do you apply contour on a round face?
On a round face, you apply contour to the hollows of your cheeks, just below the cheekbones, to create definition. You also apply it along your jawline to sharpen the look of your chin and jaw. Additionally, you can put some along your hairline on the forehead to make it appear a bit smaller. These spots help create the illusion of more angles, you know?
Can contouring make a round face look thinner?
Yes, contouring can definitely make a round face appear more slender and defined. By creating shadows on the sides of the face and under the jawline, it gives the illusion of a narrower face and a more prominent bone structure. It is essentially creating an optical illusion that changes how light hits your face, making it look a little more sculpted, which is pretty neat.

How To Contour Round Face - Maria Ma Coiffure
How To Contour Round Face – A Comprehensive Guide For You
How To Apply Full Face Makeup With Contour | Makeupview.co
